Last week I tried, unsuccessfully, to help someone on Slack with deploying a Rails application in a
subdirectory. By which I mean something like http://example.com/subdir instead of just the root as is
more usually the case. As it turns out I then needed to do this myself this week and had just as many
problems. As least some of the difficulty comes from there seeming to be a few different ways to achieve
this, as a Google search will quickly show. So what the internet definitely doesn’t need is yet another
howto. So here is one. To try and at least prevent some confusion this is for a Rails 5 application
deployed using Apache and Passenger.
After a few attempts with various environment variables the simplest working solution was to use
PassengerBaseURI in the Apache site configuration.
Here the document root, /var/www/myapp is a symbolic link to the PassengerAppRoot.
The benefit with this is that there seems to be very few changes needed in the application itself.
The only real modification is to do with the assets. As the application will be running in the production
environment the assets will be served by Apache, not the Rails application. Apache will try to
find the assets at public/subdir/assets, so we need to tell Rails to generate them there
rather than the default location. This can be done with the config.assets.prefix configuration setting.
Add this to config/environments/production.rb
config.assets.prefix = "/subdir/assets"
Now when the assets are precompiled they will be created in the correct location:
At the end of 2018 one of our members completed ingesting a large collection of photographs taken in various locations around Ireland from the 1950s onwards. It would be great for the user to be able to browse this collection on the map view. Unfortunately, however, the approach I described in Mapping with Added SPARQL can’t be applied, as the metadata does not contain geographic information in the required field, i.e., dc:spatial. There is, however, quite a lot of location information in the metadata in the title and description fields, e.g., ‘View at Lough Leane [Lower Lake], Killarney, County Kerry.’. But how to make use of this?
What is needed is a method for extracting the locations from this text. Given that the collection is quite large, an automated approach would be preferable. Happily there is a technique for doing exactly this, Named-entity Recognition (NER). NER attempts to locate and classify named entities (e.g. locations, people, organisations) in unstructured text. There are various services available that will do this for you, but as I have been using OpenRefine in the previous linked data workflows, it made sense to integrate this here as well. Ruben Verborgh created a NER extension for OpenRefine as part of the Free Your Metadata collaboration. The extension had not been updated in some time, and so was not working with the latest OpenRefine 3.1 release. I’ve created an updated fork of the extension that you can find on GitHub. The extension allows you to configure and use multiple online services to perform NER on a column of values in an OpenRefine project. These services include, DBpedia Spotlight, Dandelion API and others.
Once installed using the extension is straightforward. Click the down arrow in the title of the column you want the NER to be performed on and select ‘Extract named entities…’.
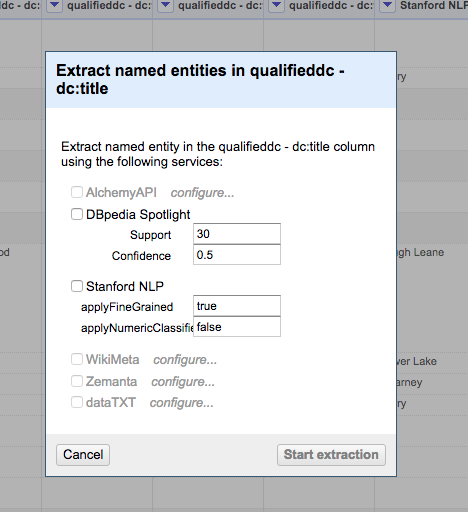
This opens a dialog where you can select the services you want to use, and set any extraction parameters available.
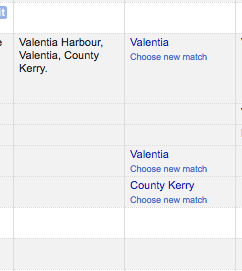
There first service that I tried, as it is freely available, was the DBpedia Spotlight service. This performed well, and as an added bonus also returns a DBpedia URL with the value. As you can see in the example below, it has managed to extract ‘Valentia’ and ‘County Kerry’, from the value ‘Valentia Harbour, Valentia, County Kerry’.
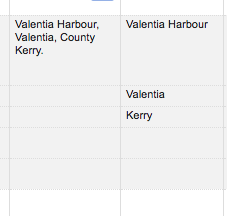
Many of the other services require signing up for an API key, and have various limits on the number of calls that you can make. Although this would probably be fine for most use cases, I wanted to try and configure a service that I would have more control over. Stanford NLP provides a set of human language technology tools including NER. It is possible to download the software and run it locally as a service. This was easy to do following the instructions available in the CoreNLP documentation. To use this with the NER extension meant writing a new service class. The NER extension has been written in such a way as to make it extensible. The full code for the new service class, StanfordNLP.java is available to view on GitHub. Running NER on the column against this service, performed similarly to the DBpedia Spotlight service, although in some cases it gave perhaps better entities. For example it returns ‘Kerry’, rather than ‘County Kerry’. It also managed to extract ‘Valentia Harbour’, not just ‘Valentia’.
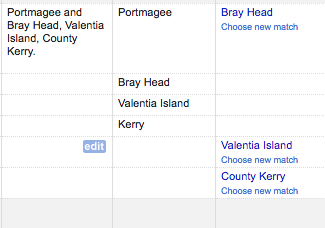
In some cases it also seemed to find more entities, such as ‘Portmagee’. Obviously here we are missing the DBpedia URL, but as the next stage will involve reconciliation using the RDF extension, that might not be an issue.
Linked Data Step 1 was adding RDF, generated from DRI XML metadata, as an output format of the DRI repository application. Step 2 is using OpenRefine to reconcile the RDF metadata fields with other datasets; namely, DBpedia, LCSH (for subjects) and Linked Logainm (for places).
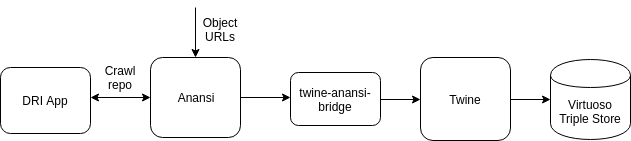
The last step is to import this enhanced RDF, exported from OpenRefine, together with the RDF output generated by the DRI application into a triple store to allow for querying. The final full workflow then, comprised of each of the three steps, is as shown in the figure below.
The RDF generated by the application from the object’s XML metadata follows the guidelines produced by the BBC’s Research and Education Space (RES) Project. To allow for the automation of the process of importing the RDF into the triple store, more components from the RES project can be used. Anansi is a web crawler that ‘includes specific support for Linked Data’. Objects from the repository the we wish to import can be selected by adding their URLs to the Anansi crawl queue. The second component Twine reads resources that have been successfully crawled and processed by Anansi, processes these and imports the resulting RDF to the triple store.
In Linked Data Step 1 I ended by saying that the next step
was to perform reconciliation on selected object metadata terms and to add the resulting links to the object’s RDF output.
In fact, looking at the RDF snippets given as examples, you can see that this was already done. The fields I reconciled
were dc:creator, dc:subject and dc:spatial. To do this those terms were exported from all the objects
contained in one collection and then imported as a project in OpenRefine. Using OpenRefine together
with the RDF extension I reconciled these against DBpedia, LCSH (for subjects) and Linked Logainm (for places). The
RDF extension allows you to build a skeleton (a template for the RDF output) for exporting to either RDF/XML or TTL. The exported RDF
can then be imported to a SPARQL endpoint.
Here, for example, is the generated RDF output for a reconciled subject term, based on the skeleton that I defined:
You can see that the subject term value Easter Rising 1916 has been linked to an LCSH subject and a
DBpedia entry. Now when you view the RDF format output of an object containing this value, you see the link
to the RDF resource instead of the literal:
This method takes the literal value, e.g. ‘Easter Rising 1916’, and queries for the subject of a triple
that has this value as a preferred label. If one is found, this is used in place of the literal value.
The final step then is to take the RDF output for each object in a collection, including the new reconciled URIs and import them into the
SPARQL endpoint.
Some time ago I put together an application for batch ingesting data into the DRI repository.
This app was to replace the existing command-line tool. Although I did use the app a few times,
it never really became part of the production infrastructure. At least, not in a way that would make
it available to end users. I decided that the easiest way forward was to integrate the functionality
into the repository, but without having to add all the code directly into the codebase. To do this I
converted the app into a Rails engine.
First step, create the engine skeleton:
rails plugin new dri_batch_ingest -T --mountable --full
This creates the basic directory structure and files needed by the engine. Once this exists the next task
is to copy the source files from the app into the correct locations in the engine. Because this is to be a
namespaced engine the main directories are:
The original application had a number of dependencies for the frontend. The correct place to put these in an engine
is the gemspec file, dri_batch_ingest.gemspec.
Two extra dependencies that could not be added to the gemspec are avalon_ingest and browse-everything.
The first of these bundles together some functionality for performing the batch ingest, the other allows for browsing
various cloud-storage endpoints. I’m pulling these dependencies from github, which is not allowed within the gemspec, so
these had to be added to the Gemfile.
To load these dependencies we need to edit the engine file, lib/dri_batch_ingest/engine.rb:
# dependenciesrequire'underscore-rails'require'fuelux-rails-sass'require'browse_everything'moduleDriBatchIngestclassEngine<::Rails::Engineisolate_namespaceDriBatchIngest# use rspec for testingconfig.generatorsdo|g|g.test_framework:rspecend# this allows the migrations to stay in the engine# rather than having to copy them into the app the # engine will be used ininitializer:append_migrationsdo|app|unlessapp.root.to_s.matchroot.to_sconfig.paths["db/migrate"].expanded.eachdo|expanded_path|app.config.paths["db/migrate"]<<expanded_pathendendendendend
and then require the javascript in the asset pipeline, app/assets/javascripts/dri_batch_ingest/index.js
The namespacing of the engine means that migrations also look a bit different from a normal application. They have a prefix, in this case dri_batch_ingest_. Here is an example:
This engine now encapsulates all the batch ingest functionality needed by the main DRI repository application. You can see the full engine in the DRI github.