For the last two months I’ve been looking at another major migration of the DRI’s data models.
The last migration happened just before the official launch (yes, that was not a great idea)
when we moved from Fedora 3 to Fedora 4. As well as modifications to the data model code,
that migration also required re-ingesting all the objects in the repository to a new Fedora 4 server.
With a relatively small number of collections this was a possible, if lengthy operation.
The reason for this latest migration is a combination of factors. First there has been a change in
the underlying storage used by the latest versions of Fedora. Fedora 4 uses Modeshape as a data
store and initially this in turn used Infinispan. Recently Modeshape has dropped support for Infinispan
meaning that the latest versions of Fedora (4.7+) now use Modeshape with RDBMS backends. Although
this is a welcome change, it does pose a problem, in that the migration path is a full backup and
restore of Fedora. Basically take everything out and then re-ingest it again. To date I have not managed
to successfully complete a full backup and restore in this way.
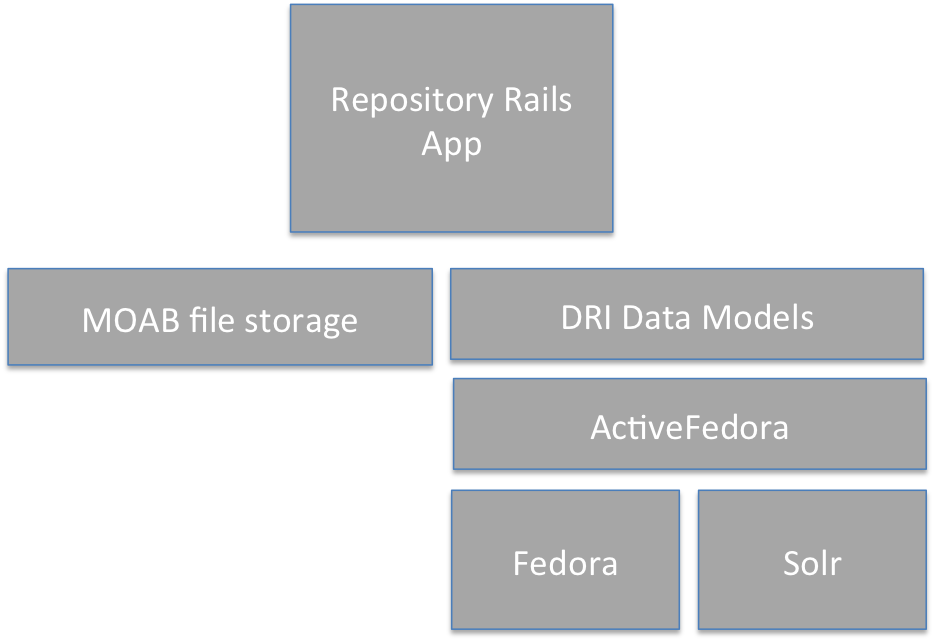
A second is really a result of legacy problems to do with Fedora 3. A lot of our code involved
avoiding making use of Fedora where possible for performance reasons. So, for example, all queries use Solr
and we do not store the binary files (assets) in Fedora datastreams, but rather direct to disk. Another
development was our use of Moab for preservation storage of metadata and binaries. Doing this has meant
that Fedora is purely being used as on object store, but we are not making any use of its other features.
It made sense then to take this migration path problem as an opportunity to try out another approach.
ActiveFedora, the library used to interact with Fedora is described as ‘loosely based on “ActiveRecord”’.
The most obvious and potentially straightforward migration then would be to move instead to just
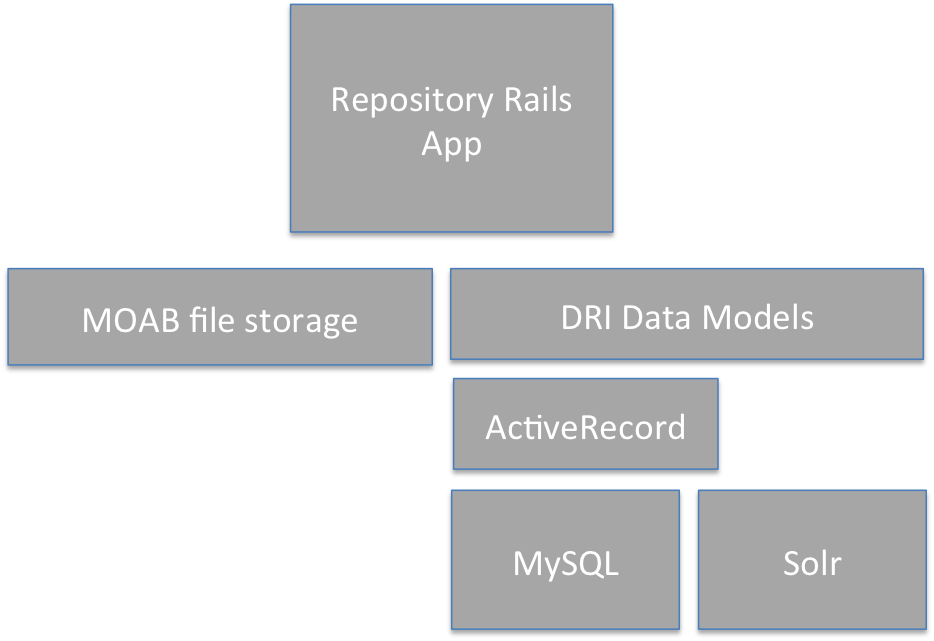
using ActiveRecord directly. So that is what has been done. Currently a simplified version of our stack
looks like this:
Following the migration it will be as below. Although this might look like not much has changed, this is a significant
step. Hopefully this will lead to better performance as well as a more understandable and more easily managed infrastructure.
It should also allow us to keep in line with future Rails and gem dependency releases.
More details on how the migration is being done to follow.
My on-again, off-again attempts at adding linked data to the DRI app has recently been on again. There
have been several false starts at how best to translate the object’s XML metadata to RDF. My approach until
now has been to import the metadata into OpenRefine and to then use the RDF extension to reconcile against
SPARQL endpoints. Following that the metadata can be exported to RDF and imported into a triplestore for
querying. For two example collections this worked, but it was not exactly scalable. There was also the problem
of how to handle any updates to the objects. Would the whole process have to be repeated?
A better method seemed to be to break the process into stages, solving conversion to RDF as the first step. By only taking the common
metadata fields that DRI maps across the metadata standards, converting to RDF is a straightforward process. Using
content negotiation RDF can simply be added as another output format for an object. The application itself
can handle the conversion.
A project I’ve been looking at for a while is the Research and Education Space (RES) Project. This
project indexes linked open data published by multiple providers. They have provided a set of guides, including one
for data providers that explains the format to be used for data publishing. The RDF output produced by the application
tries to follow that described in this guide.
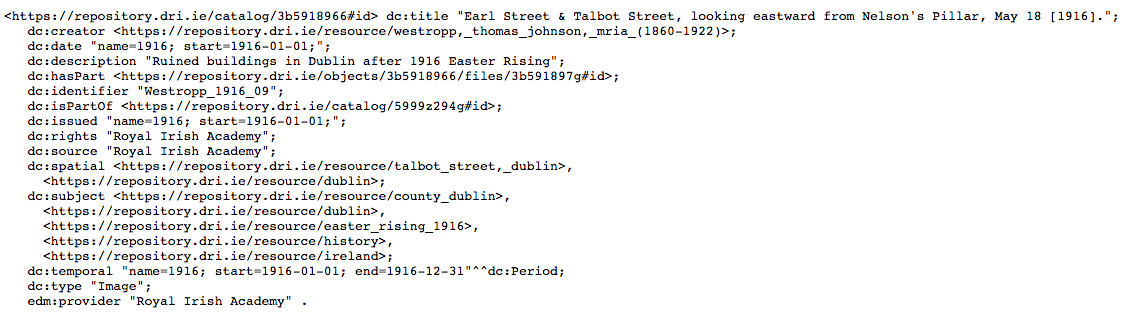
The first part of the RDF output is a description of the object document itself.
You can see in the above that the document has two representations, a HTML webpage and Turtle format RDF output.
Next was the mapping from the XML metadata fields to RDF, using Dublin Core terms.
I’m also using a field from the Europeana Data Model, edm:provider, for the DRI organisation that deposited the object.
Finally then was the description of the asset (content) attached to the object, in this example an image.
This uses, as suggested by the RES guide, the Media RSS vocabulary for the directly accessible media.
So now I can request any object in RDF TTL format easily. The next step is to perform reconciliation on selected metadata terms and
to add the resulting links to the RDF output.
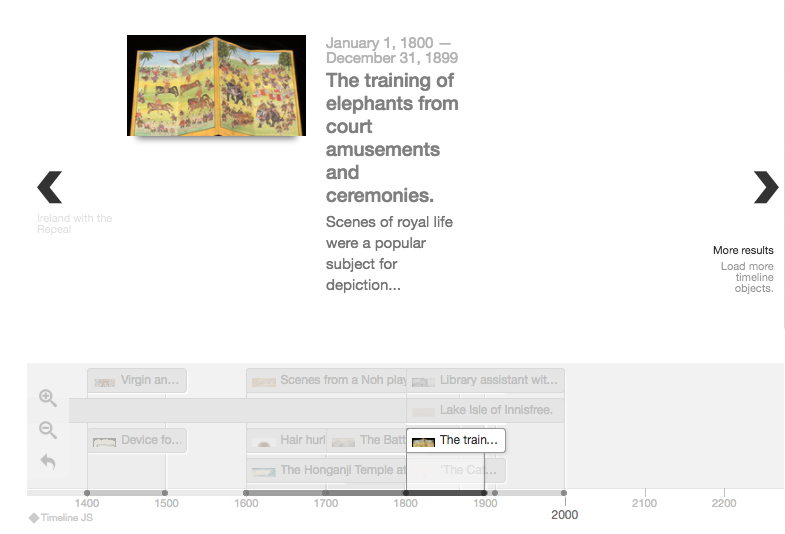
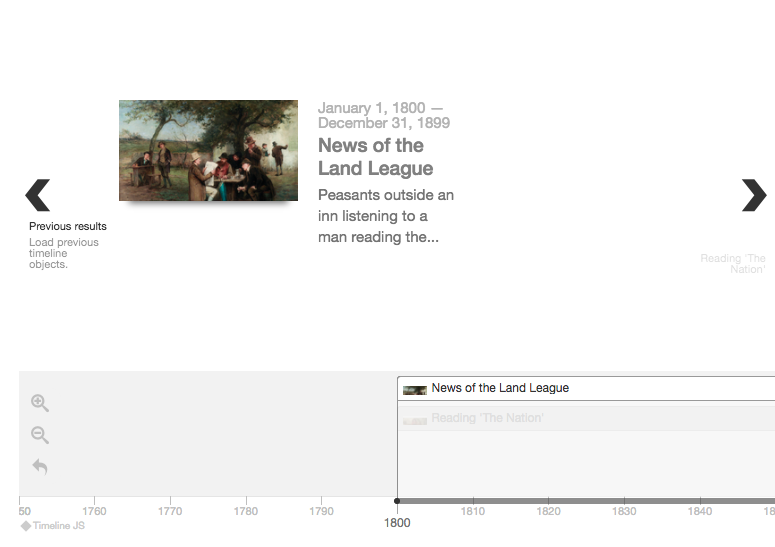
I should start with a disclaimer that this isn’t really the use intended for a timeline. From
the TimelineJS website you can see that it is really meant to tell a story, and should probably
have only around 20 or so slides. We are using a timeline as essentially another way to browse
objects, or to visualise search results. Because this use case isn’t supported out of the box
I needed to find a way of dynamically loading objects as a user scrolled back and forth, as clearly
loading all the objects at once would not be possible. Ideally something like this could be
handled with Ajax requests, retrieving data when needed. But our browse/search already supports
paging of results, so a simpler, if slightly hacky way, was to make use of this.
First some variables need to be accessible to the javascript for creating the timeline. This can be done
with data attributes.
The attributes provide the total number of pages of results and the current result page that is being viewed.
Normally when the end of the timeline is reached the next slide navigation is disabled. What I wanted is to
re-enable this but have it retrieve the next page of results rather than the next slide. That is
what the javascript below does.
If we are viewing the last slide the next slide navigation is enabled, but the title and description are set
to show that it will now load more results. If the navigation is clicked URL query parameters are set (tl_page)
to the next page and loading of the new URL is triggered.
timeline.on("nav_next",function(data){varslides=data.target._slides;for(vari=0;i<slides.length;i++){if(slides[i].active==true){index=i;}}if(index==slides.length-1&¤tPage<totalPages){if($(".tl-slidenav-next .tl-slidenav-title").html()=="More results"){query=setUrlEncodedKey("tl_page",currentPage+1);query=setUrlEncodedKey("direction","forward",query);$(location).attr('href',query);}else{$(".tl-slidenav-next").show();$(".tl-slidenav-next .tl-slidenav-title").html("More results");$(".tl-slidenav-next .tl-slidenav-description").html("Load more timeline objects.");}}});
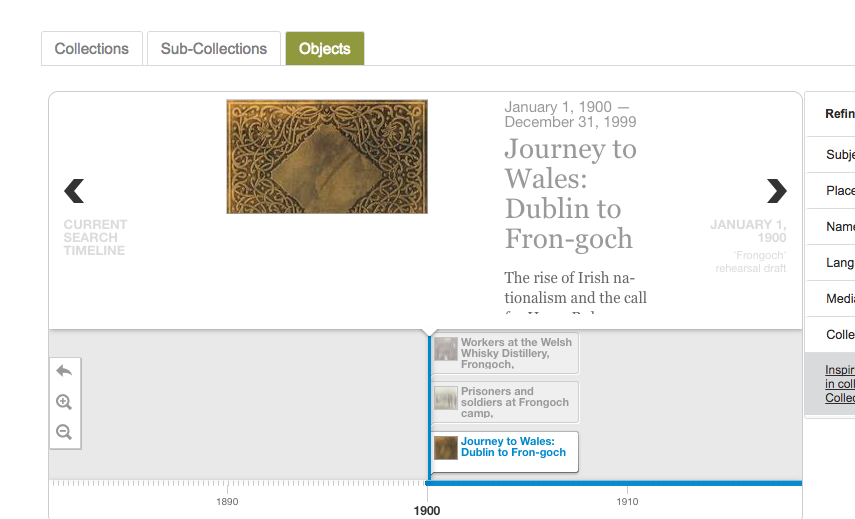
Allowing previous pages to be loaded is almost exactly the same, except that we are moving in the
opposite direction.
One issue with loading the previous page of results is that the timeline will start from the first slide
rather the last, which is not really what you might expect when navigating the timeline. I haven’t found a
totally satisfactory solution for that one. The best I have so far is to tell the timeline to start from the end.
Now when the previous page loads it automatically scrolls to the last slide.
One of the features added to the DRI repository just before launch was a timeline view for objects.
There were a number of problems with this initial implementation that I’ve been meaning to fix.
First of these was that the TimelineJS script was being loaded from an external URL, rather than
through the asset pipeline. Also, looking at the Github account for the Timeline script, showed that
development on that version had stopped, and had switched to the new TimelineJS3.
To rectify both of these easily the obvious thing to do was to find a TimelineJS3 gem. I did find one, although
it didn’t seem to have been updated for a while. Instead, I used a fork that had been modified more recently,
and looked like it had some fixes for the asset pipeline. This worked well in development, but testing in a
production environment showed that the assets were not loading correctly. To sort that I forked this version and
modified the gem’s engine.rb to add the assets to the asset path and to precompile the font files.
Thanks to buying a very cheap Google Cardboard viewer I became very distracted with VR and 3d. Starting out
with Android Studio, I then moved on to trying out the Unity game engine. I was following a really
good tutorial for building a virtual museum, thinking that it might be a fun idea to use with
some of the DRI objects.
Getting used to Unity took some time. The other problem was that the tutorial was written for an earlier Unity
version. I was using Unity 5, so some of the scripts were not working as expected. The idea of the demo is that
you can walk around the museum and view information on the exhibits in a pop-up that appears when you click
the fire button while standing in front of an object. It was this interaction that didn’t seem to be working.
The tutorial provides 3 scripts that should be attached to game objects. It was the ArtifactViewer.js script
that was causing problems. This script is intended to disable the FPS controls when the user presses fire
while standing in front of an object and sends a message to show the information GUI. However, it would not
compile due to errors about MouseLook. Specifically that it did not denote a valid type. This is the original
script.
//Private variables//Control of the Look X AxisprivatevarmouseX:MouseLook;// Control of the Look Y AxisprivatevarmouseY:MouseLook;// Controls of the movementprivatevarcontroller:CharacterMotor;// The Start function is part of the Unity API.// It's called once when the application begins running// Purpose: Find the various controls and store them in a variable for later use// This code demands that the script be attached to Main Camera inside// the First Person Controller. Otherwise, there will be errors.functionStart(){mouseX=GetComponent(MouseLook);mouseY=transform.parent.GetComponent(MouseLook);controller=transform.parent.GetComponent(CharacterMotor);}// Enables or disables the User ControlsfunctiondisableControls(b:boolean){mouseX.enabled=b;mouseY.enabled=b;controller.canControl=b;}// The Update function is part of the Unity API..// It's called every frame. It's essentially an infinite loop until// the application is shut down.// Every frame we check to see if the LMB was clicked.// If so we do a raycast from the camera to 10 meters out.// If the raycast hits an object with the "Artifact" tag,// disable the FPC Controls and enable the GUI and Rotate ModefunctionUpdate(){if(Input.GetButtonDown("Fire1")){varfwd=transform.TransformDirection(Vector3.forward);varhit:RaycastHit;if(Physics.Raycast(transform.position,fwd,hit,10))// Perform Raycast{if(hit.collider.tag=="Artifact")// check tag{disableControls(false);// If the object has GUI data, turn it onhit.collider.SendMessage("toggleGUI",true);// If the object has rotate mode, enable ithit.collider.SendMessage("toggleControl",true);}}}}
I tried quite a few things such as adding namespaces. I also realised that the FPS character I was using did
not have a MouseLook component, so switched to the Rigid Body FPS character which did. None of this helped.
I figured maybe the issue was with using JS rather than C#, so I tried converting the script. This definitely
helped, and I was finally able to get past the compilation errors. But having done this, disabling the controls
was still not working. Eventually, after a lot of messing around I ended up not using the MouseLook code at all.
I changed it to use Cursor lockState based on various forum posts. The working C# script is below. There was
an extra script that would make the objects rotate which I didn’t use.
I’m sure it would be possible to get the JS script working, but as a beginner this was how I did it.
usingUnityEngine;usingSystem.Collections;usingUnityStandardAssets.CrossPlatformInput;usingUnityStandardAssets.Characters.FirstPerson;publicclassartifactViewer:MonoBehaviour{privateRigidbodyFirstPersonControllercontroller;// Use this for initializationvoidStart(){controller=transform.parent.GetComponent<RigidbodyFirstPersonController>();}// Update is called once per framevoidUpdate(){if(Input.GetButtonDown("Fire1")){Vector3fwd=transform.TransformDirection(Vector3.forward);RaycastHithit=newRaycastHit();if(Physics.Raycast(transform.position,fwd,outhit,10))// Perform Raycast{if(hit.collider.tag=="Artifact")// check tag{disableControls(false);// If the object has GUI data, turn it onhit.collider.SendMessage("toggleGUI",true);}}}}// Enables or disables the User ControlsvoiddisableControls(boolb){if(b==false){Cursor.lockState=CursorLockMode.None;Cursor.lockState=CursorLockMode.Confined;Cursor.visible=true;}else{Cursor.lockState=CursorLockMode.None;Cursor.visible=false;}controller.enabled=b;}}